
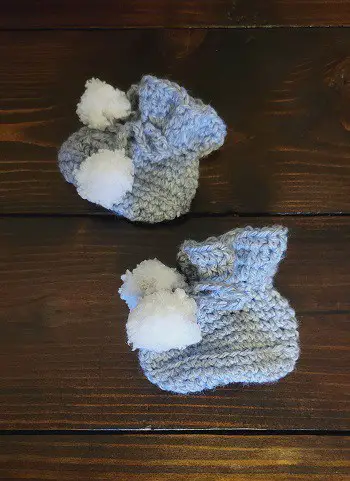
Crochet baby items are always a hit! They are tiny and adorable! They work up quickly due to the small size. They don’t take a lot of yarn, so they are relatively inexpensive. And they are homemade, heartfelt items that can be passed down through generations or loved on until they fall apart!
I was browsing Anthropologie’s website and found some really cute knit baby booties. To be honest, I don’t recall how much they were, and they are now sold out. But I decided I could problem crochet something similar. (I don’t know how to knit.)

I pulled out some stash yarn and went to work! because these are so small, you don’t need a lot of yarn, so stash yarn is a great option! I adapted this pattern from various other baby booties or shoes I’ve done to create the sole shape, then the upper, then the wide, ruffled-looking ankle area. I am very please with the look, and now I have something already created for the next baby shower I go to!
Below is the written pattern, and the video tutorial for these booties! Enjoy!
Crochet Pattern: Pom Pom Newborn Booties
Designed by Crafty with Ashy
Skill level:
Intermediate
Size:
Newborn (4-inch sole).
Gauge
At end of round 3, the bootie sole measures 4 inches long
Materials:
Bernat Softee Baby-1 oz (If you choose to use a different brand, you will need approximately 1 oz of weight 3 acrylic yarn.)
Specialty fuzzy yarn: Of your choosing, approx 1 foot.
Size G/4.25 mm and I/5.5 mm crochet hooks
Darning needle
stitch marker (I use bobby pins)
Stitches/abbreviations used:
- Chain (ch)
- Slip stitch (sl st)
- Single crochet (sc)
- Half double crochet (hdc)
- single crochet back loop only (sc-blo)
- Double crochet 2 together (dc2tog)
- Skip (sk)
- single crochet front loop only (sc-flo)
Notes
The pattern is worked in the round from bottom to top.
The bootie is worked with a size G/4.25 mm hook, and the poms with a size I/5.5 mm hook.
The number in parentheses at the end of each round is how many stitches you should have (not counting sl sts)
Pattern:
Bootie
(with size G/4.25 mm hook)
Ch 10
Rd 1: sc in 2nd ch from hook (place marker), sc in next 5, hdc in next, 2 hdc in next, 5 hdc in next; (work down opposite side of ch), 2 hdc in next, hdc in next, sc in next 5, 2 sc in next (25)
Rd 2: 2 sc in first sc of last round (move marker to 1st), sc in next 8, *2 sc in next, sc in next* 3 times, sc in next 7, 2 sc in next, sc in next (29)
Rd 3: 2 sc in marked stitch (move marker to 1st), sc in next 9, 2 sc in next, *sc in next, 2 sc in next* 3 times, sc in next 10, 2 sc in next, sc in next, sl st to marked stitch (35)
Rd 4: sc-blo in same as sl st (place marker) and each st around, sl st to marked stitch (35)
Rd 5-6: sc in same as sl st (place marker) and each st around, sl st to marked stitch (mark sl st) (35)
Rd 7: sk 1st stitch (the one with the sl st), sc in next 11 (place marker in 1st), sk 1, hdc in next, *dc2tog* 4 times, hdc in next, sk 1, sc in next 12 (last worked into marked sl st of pervious round), sl st to 1st st of round (29)
Rd 8: sk 1st stitch (the one with the sl st), sc in next 9 (place marker in 1st), sk 1, sc in next, sk 1, sc in next 3, sk 1, sc in next, sk 1, sc in next 10, sl st to marker stitch (24)
Rd 9: sk 1st stitch (the one with the sl st), sc in next 7 (place marker in 1st), *sk 1, sc in next* 3 times, sk 1, sc in next 9, sl st to marker stitch (19)
Rd 10: sc-flo in same as sl st (place marker), sc-flo in next 6, sk 1, sc-flo in next, sk 1, sc-flo in next 8, sl st to marked stitch (16)
Rd 11: 2 hdc in same as sl st (place marker in 1st) and each around, sl st to marked stitch (32)
Rd 12-13: hdc in same as sl st (place marker) and each around, sl st to marked st (32)
Fasten off and weave in ends.
Tie
(with size G/4.25 mm hook)
ch 60. fasten off. weave through rd 10 starting at the front of the ankle.
Poms (See video reference)
(with size I/5.5 mm hook)
ch 3. sl st to first. sc into hole in middle and randomly to make a round-ish ball. when it is approx 1-inch diameter ((approx 12 sc), sc to connect to tie (inserting hook into the end of the tie) a few times to secure it to the tie. Fasten off and tie knots to secure, trim tails.
Make a pom for each end of the tie.
(This is not a precise part of this crochet project, with a fuzzy/fluffy yarn, you can randomly sc until it is a sphere, and it looks just like a cute pom pom.)
Repeat all steps for 2nd bootie
With my written pattern and video; I am trying to appeal to all the learning styles. Is there another way that YOU would like to help YOU learn more?? Let me know in the comments!
Now it is time for YOU to Get Crafty with Ashy!
©Crochet PomPom Newborn Booties COPYRIGHT
Please do not copy, redistribute or sell my pattern in any way. All photos/videos, designs, and patterns are copyright of Crafty with Ashy unless otherwise noted. Please do not claim my content as your own. If you repost, please credit to my original work. You are more than welcome to sell your finished Crochet PomPom Newborn Booties. I ask that you please credit me for the pattern.