
Watercolor painting is an enjoyable, challenging, and satisfying hobby. Getting started with watercolor is actually pretty simple, so I recommend the hobby to anyone!
My five top tips for getting started with watercolor are buy watercolor paper, buy watercolor paint, buy watercolor brushes, get to know your materials, and finally, sometimes you have to go too far to learn when to stop.
With these essential tips for starting watercolor, you will begin creating and give yourself the freedom to enjoy the process! This post contains practical and theoretical information to get you well on your way to your new favorite hobby; watercolor painting!
Buy your paper
First, determine the quality of watercolor paper you are currently willing to invest in.
Typically, watercolor artists prefer 100% cotton watercolor paper that is at least 300 gsm (grams per square inch). This type of paper is designed to hold water while maintaining its integrity. Cotton makes the paper react in a specific way that allows watercolor to flow in a predictable and beautiful way. GSM describes the thickness of the paper, so the higher that number, the thicker the paper. This will make it less likely to warp. There are other options, of course, but this is the general recommendation. Arches is the gold standard in watercolor paper, but some alternatives are Baohong, Saunders Waterford, and Hahnemuhle.
If you want a more budget-friendly option, either a student-grade 100% cotton paper, like Academy, or a non-cotton, cellulose option like Canson or Arteza are viable options. Go in with the understanding that certain techniques work differently on different papers.
I actually like “lower quality” paper for some paintings, especially ones that don’t include full coverage (or “washes”) of paint or lots of layers. For example, my princess series was all done on Arteza Watercolor “premium” paper for mixed media. I found that I could lift out highlights easier on this paper, which was great for the subject I was painting but would not have been great for a subject with many layers.
Second, understand that watercolor paper comes in different textures, which will affect your painting process.
Watercolor paper comes in three textures from very smooth to very rough or “toothy.”
If you plan to paint loosely, without too many tiny details, you will want to start with textured paper called “cold-pressed” or “not” (which just means not hot-pressed, which is a weird name).
If you plan to paint very detailed, illustrative works or use pen/ink, you will likely want a smoother paper called “hot-pressed.”
Eventually, I suggest you try both and throw in the more textured, “rough” paper, but start with one to limit the impact on your initial budget.
A perfect option for someone just starting out with watercolor is to purchase a sketchbook designed for watercolor painting. This gives you the emotional freedom to experiment with your new hobby. It also gives you a great way to organize your painting journey and reflect on your progress. It offers an excellent reference for things to avoid in the future and things to repeat or emulate.
There are many options for watercolor sketchbooks. It is best to purchase one designed for watercolor so the pages do not excessively warp (there will always be some warp in a sketchbook) and do not disintegrate with water.
I have personally used some great sketchbooks. including Moleskine, Tumuarta, Paul Rubens, and Arches (remember the “gold standard”).
These vary in “quality,” but they offered a great watercolor experience for me. They provided an excellent place to work out techniques, ideas, sketches, and compositions and allowed for some of my most cherished paintings, such as my first portrait ever.

Buy your paints
Pans vs. Tubes
Watercolor paints come in pans or tubes. Pans are prefilled, dried watercolor paints that often come in a metal or plastic portable palette. They require activation with water. Tubes come, as expected, in a small tube. They are then squeezed onto a surface (usually a palette, but anything non-absorbant will work). They do not require activation with water, but you will use water to adjust the paint’s consistency, transparency, and value (how light or dark). The paint from tubes can be left to dry and then used exactly as the pans are.
I prefer to buy tubes and fill my own pans for my travel palette and a large (not so portable) palette for my home/studio set-up. I find it is more cost-effective, and I enjoy squeezing the paint out, just from a purely tactile experience. Some people prefer to work only with pre-made pans, which can be more convenient.
Brand
If you are struggling to choose which brand of paint to start with, let me just start with, it doesn’t matter that much. I know that sounds flippant, but it really doesn’t. Just start somewhere. Decide on your budget, then purchase something that falls within it.
Craft or “kids” level paints will be more chalky and less vibrant or pigmented than higher quality paint. “Student grade” paints will be in the middle. Professional paints will be the most pigmented. There are other differences, but that would be the most obvious.
Winsor and Newton Cotman is an excellent option for student-grade paints if you want a specific recommendation. They require more time to activate than professional-grade paints, so I recommend spraying them with a generous amount of water from a small spray bottle and waiting a few minutes to start. Throughout the painting session, it is also good to spray intermittently.
For professional-grade paints, any of the major brands are great. I use Winsor and Newton professional watercolors, but Daniel Smith, White Nights, A. Gallo, Rembrandt, M. Graham, Sennelier, Da Vinci, Holbein, Schmincke, and Van Gogh are also highly recommended. Down the road, there is nothing to say you cannot mix and match brands, either!
Colors
I recommend starting with a limited palette. This will decrease your initial cost and a potential barrier to starting. It will also allow you to learn more about color mixing and color theory just by playing around with the colors. A limited palette will also help you avoid some anxiety that can come from too many options, the “paralysis of analysis.”
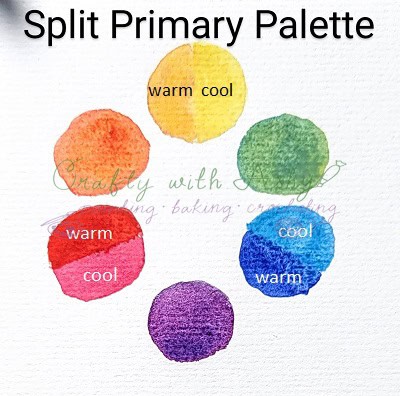
The split primary palette is a great option for starters. Split primary palettes include two variations of yellow (one leaning green and one orange), blue (one leaning more purple and one greener), and red (one leaning more purple/pink and one more orange). This breaks each color into “warm” and “cool” varieties, allowing for much easier mixing to achieve vibrant or duller colors.
You can purchase these colors in a set like this Daniel Smith offering or individually if you prefer a different brand. If you plan to purchase a different brand, I recommend using the colors in that set as a guide. (It can be tricky to determine which of the 30 blues to pick!)
Another option is a set that includes a couple of “convenience colors,” which describe colors that could be mixed relatively easily (e.g., green is made from blue and yellow mixed). An example is this one from Winsor and Newton Cotman or this one from Sennelier, which is their student-grade option.
If you are looking at different brand options, I suggest having a pinkish red, a generic yellow (which can be tinted to make it a warm yellow with a bit of red/pink), and two blues.
Buy your Brushes
Some people might come at me for this, but I have been fine with using basic watercolor brushes. Mine aren’t super cheap because those ones will shed bristles, which is super annoying, but I don’t find the need to own the best brushes.
Material
You should have two specific types of brushes. First, something that holds a lot of water for washes, and second, something that is a bit “snappier” to allow for control.
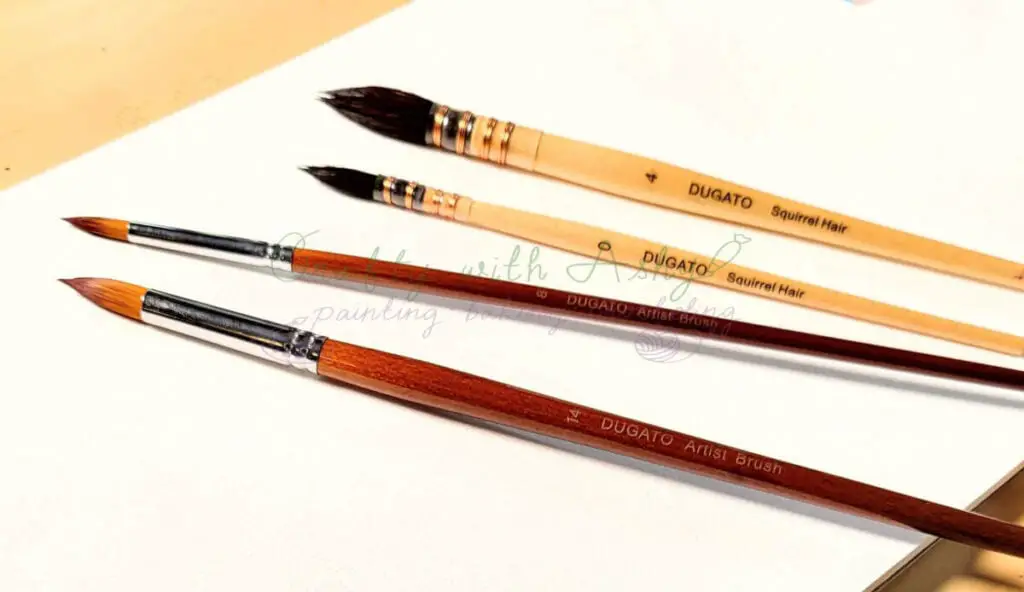
A synthetic or natural squirrel hair brush is preferred for a “floppier” brush that holds a lot of water.
For snappier brushes, something that maintains a good point and bounces back to shape well is essential. Sable or a similar synthetic blend is perfect. Taklon is often the synthetic version, but many brands just say “synthetic sable” and don’t specify what the synthetic fiber is.
I use Dugato brand brushes for my soft squirrel hair and snappy synthetic brushes. I also enjoy my Princeton Select Artiste Brushes, which are stiffer and great for lifting and details..
Shape
In terms of shape, having just a few options will allow you to experiment with different mark-making techniques and create a huge variety of brushmarks in your paintings.
First, get a nice round brush with a good tip in a snappy material.
I recommend purchasing at least two sizes: one smaller and one medium to large. Round brush size names are not standardized across brands, which makes it hard to recommend a size, but they are numbered. A size 4 and size 10 would be a good space between the sizes, but again, a size 4 in one brand could be much different than a size 4 in another.
I also suggest a mop brush in a soft material.
A rigger or liner brush and a flat brush are also beneficial for beginner painters.
Other brush shape options are angle/angle shader, dagger, filbert, fan, and cat’s tongue brushes. You can add these to your collection later if desired.
Get to know your materials
How you prefer to learn and understand your materials depends on your personality and learning styles (e.g., visual, auditory, kinesthetic). Regardless of your style, you will need to actually paint to learn how your materials work and interact with each other, but to start, you can consume as much or as little information as you would like.
Learn by doing
The first option is just diving in and playing around on your own. This can be fun and exciting or terrifying, depending on your personality. If this is your idea of a good time, go for it. Like now. Just get started!
Learn by reading
Another option is reading information about watercolor materials and techniques. You can find many books and blogs on the topic.
I highly recommend checking out your local library. I have borrowed three books on watercolor lately and have learned so much! It is a great way to dive deeper without investing too much! There are at least four more watercolor-specific books at my local library that I plan to check out down the road.
Each book I have read has started similarly by describing the tools and techniques used in watercolor painting. This can really guide you in where to begin your journey.
The internet has what sometimes feels like an unlimited depth of available content. It can sometimes be challenging to find what appeals to your learning style, but if you dig a little, you’ll definitely find information that will guide you in getting to know your materials.
Learn by hearing
I am a very auditory learner. This can be a challenge for something like creating art, which is very visual and kinesthetic. I find that playing YouTube tutorials, without even watching them, helps me visualize or use imaginary practice to develop skills. I can listen to the person describe what they are doing, then try it out myself and adapt based on feel and intuition versus trying to copy what I see them doing.
Learn by watching
Watching others create is a viable option for learning the materials.
Scrolling through “shorts” or “reels” can be helpful, even without voiceover. They demonstrate what to do and how to do it without the often distracting voiceovers. Many people prefer to learn just by watching others do those techniques without a step-by-step narrative. If you are this type of learner, you can also achieve this by watching videos without sound.
One thing to note is that often, these are very sped-up versions of the painting, so be sure to consider that when you start your own practice.
Learn by combining styles
Combining watching, listening, and doing is also a great option for learning your materials.
Taking a class, virtually or in person, will allow you to follow a specific plan for learning water control, mixing, application techniques, brushstrokes, etc. There are many watercolor beginner courses which break down the learning into step-by-step tasks. These are typically intended to be completed while you are watching and listening.
Following tutorials for finished pieces from artists you admire is another option for combining learning styles.
You can jump right into following a beginner tutorial for a finished piece. In this way, you will get immediate gratification of painting “something,” but you can also learn water control and different techniques as they are described by the artist.
This can sometimes lead to frustration, as the finished work likely will look different from the artist’s original work. We all know it takes practice and patience, but it will still be frustrating!
Another drawback of this approach is that people may find it challenging to paint “on their own” without a tutorial because they may not have developed all of the techniques or observational skills required to compose a finished artwork.
Sometimes you have to go too far to learn when to stop.
My final tip today is that it is tough to know when a painting is finished unless you have previously gone too far.
Knowing when to stop is one of the hardest parts of watercolor. If you follow any artist communities, “overworked” and “muddy” will be at the top of the list of most used words! There is no definition for these words, as their meaning is very personal to the person’s style/preferences.
To understand what that means to you, you will likely have to cross that personal boundary. If you are always worried about that line, you may never feel that your work is “finished,” which is, again, a very personal word. If you consistently feel slightly dissatisfied with your work, that it isn’t “finished,” maybe you need to give yourself the freedom to overwork a piece. This will help you determine in the future what brushstroke to stop on.
With all the information you’ve learned, you are ready to jump in and start your knew watercolor hobby!
Now it is time for YOU to get Crafty with Ashy!
Be sure to subscribe and follow me so you don’t miss any inspiration!