So you picked up a crochet book or downloaded a pattern for the cute project you want to make, but then you look at it and it has some basic instructions and then a giant picture with foreign looking symbols! It says to refer to the chart for the pattern repeats?! This can be pretty confusing if you don’t know how to “read” those symbols!
So, how do you read a crochet chart? The crochet chart uses specific symbols for each different crochet stitch. You need to know (or have a reference for) what each of these symbols means. The chart can be “written” in rows, which are worked from the bottom to the top, going back and forth up the chart; or in rounds, which are worked from the center out in a counter-clockwise direction.
So, now you know the VERY basics of reading a crochet chart, but it is still FILLED with information that you aren’t quite sure of? Keep reading for details of how to decode the information in your crochet chart!
What is a Crochet Chart
A crochet chart is a pictorial representation of the crochet pattern. It will be “written” in rounds or rows with a different symbol for each type of stitch used in the pattern.
The symbols are standardized across crochet charts. Refer to my inclusive table which shows the name of the stitch, how to work that stitch, and the symbol that is standard for charts!
Below is a video with much of the information from this post, and you can refer to the written sections for more details as needed!
Pros and Cons of the Crochet Chart
Pros
There are a few benefits of the crochet chart over a written pattern.
First, it can be a more concise way to “say” the same thing. The saying, “A picture is worth a thousand words,” is definitely true. A pattern may be 14 pages in written form, but be only 2 pages in chart form. For motifs that repeat, only one small section of the “picture” may be needed to tell you all of the information you need.
Second, many people prefer to learn with graphics versus text (seeing versus reading). The pictorial charts are beneficial if you prefer to learn that way and tend to “get lost” with written instructions.
Third, it can help you visualize what the end project is supposed to look like. Yes, there is likely a picture of the final project, but sometimes when you look at the written version of a pattern, you just can’t figure out HOW those stitches are going to result in something that looks like the picture. The chart actually looks a lot like the final project will look.
Forth, charts are standardized and are not based on a certain language. This is actually the main reason I learned how to read crochet charts. I would see fantastic patterns for crocheted skirts or tops, click the link, and the instructions were in Russian (or whatever else), BUT there was a chart available! If you know how to read a chart, you don’t always need the written instructions!
Cons
As much as I appreciate crochet charts, there are a couple of challenges with them.
First, they are typically written for a right-handed crocheter. If you crochet left-handed, you have to reverse the chart either in your head or by actually remaking it physically. I am right-handed, so I don’t really know how much work this is. I do feel like people who are left-handed tend to be very good at reversing things in their head (maybe because they are used to having to do it or because their brains just work better that way!), so maybe it isn’t so much of a problem, but I really don’t know.
Second, there are some things in the chart that are not actually able to be visualized, like working into the chain stitch or working into the chain space. The symbol is actually placed the same way on the chart for both of these cases. This can leave some things up to interpretation, or it needs to be clarified in the written instructions (which may be in a different language!)
Third, the chart only provides you with the stitches. It does not provide information about finishing or anything that may be out of the ordinary with the stitches. This information is typically included with the crochet chart, but again, it may be in a different language than you speak/read! In this case, you have to be resourceful and creative to figure it out!
Information Included with the Crochet Chart
As I just mentioned, typically the chart will come with additional instructions/information. So, before we dive into the chart in further detail, let’s look at some of that info.
The chart will likely be accompanied by all the information that a typical, written pattern includes, except for the row-by-row or round-by-round written instructions.
The information that is typically provided is the following:
- Pattern name/description: written in plain terms, describes what the final project will be
- Difficulty level: tells you if it is appropriate for beginner, intermediate, or advanced/expert crocheter
- Materials: will include information about the yarn, crochet hook, needles, etc needed to crochet the project
- Gauge: tells you how big your stitches should be
- Size information: tells you the size of the final project
- Symbol list: provides the “definitions” of symbols used in the chart
- Pattern notes: includes how to make special stitches used in the pattern, how to assemble the project, tips/trick; whatever the designed wants to communicate that doesn’t fit somewhere else
- Finishing instructions: things like sewing together, weaving in ends of yarn, etc. sometimes will include a diagram of how to stitch the piece together in pictorial form
For additional information about how to read/understand each of these sections, refer to my previous post about reading a written crochet pattern.
How to Read Crochet Charts
The first part of reading the crochet chart is understanding what the symbols mean. As mentioned above, the symbols are standardized, and I have provided an inclusive chart with that information. You may also find the information needed attached to the crochet chart in the symbol list or glossary section.
Sometimes, you may see a symbol that is not standardized. When this happens it is usually because it is a stitch that is not standardized. Stitches like the extended double crochet does not have a standard symbol yet, so a pattern designer may “make up” a symbol. In this case, the list in the pattern would be VERY necessary!
Once you know what each symbol means to actually do, you can start figuring out how those symbols are arranged. So basically, you will crochet a certain stitch, at a certain time, in a certain place based on those symbols.
The hardest part of reading a crochet chart is finding where to start. When you look at a giant picture of hundreds of symbols, it can be overwhelming, but once you figure out where you are supposed to start, then you can take it one symbol at a time. Often, there is an arrow indicating where to start, but not always. Where there is not, there are some standards that you want to look for to find where to start.
The easiest way to learn this is to actually LOOK at the chart and practice “reading” it. So let’s do that!
Let’s first look at an example of a chart that is written in rows.
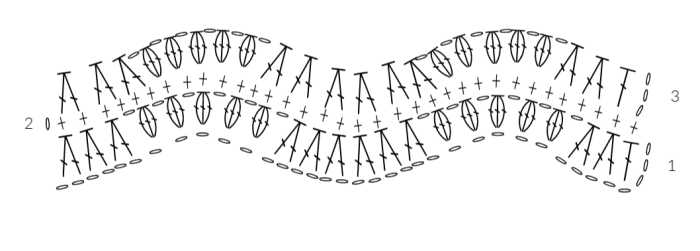
So in the above example, you will see that there IS NOT an indication of where to start. (No arrows). The basic thing that you need to know, when a chart is in rows, is that you start at the bottom and work your way up the chart.
In this example, look at the very bottom and you will see a bunch of open ovals. These indicate chains (refer to the symbols chart). The first oval on the left of the pattern has nothing before it, so that means we must start there. We know we don’t start on the other side because the chains are curving around and jumping into the next row.
So now that we found that, we can just count the number of ovals to tell us how many chains to work for our “foundation chain” row. In this case, there are 36 of the open ovals. This means to chain 36 times.
At the end (right side), you see the chains curve upward, that is where you are turning your work. (It is labeled with a “1,” indicating that it is row 1 of the pattern. Often times the rows will also be alternating colors to make them easier to distinguish.)
After that curve upward, you can see the symbol for a double crochet is sitting “on top of” the 4th circle. This mean “work a double crochet into the 4th chain from your hook.”
So at this point, you just keep looking at the next symbol and what it is on top of, to figure out what stitch to do next. Let’s write out this chart in written pattern form.
- ch 36
- row 1-dc into the 4th ch from hook, dc2tog 2 times, ch 1, [CL into next st, ch 1] 5 times, dc2tog 6 times, ch 1, [CL into next st, ch 1] 5 times, dc2tog 3 times (to the last ch). turn
- row 2-ch 1, sc into top of each st across (do not work into t-ch), turn-(34 sc)
- row 3- ch 3, sk first stitch, dc into next stitch, dc2tog 2 times, ch 1, [CL into next st, ch 1] 5 times, dc2tog 6 times, ch 1, [CL into next st, ch 1] 5 times, dc2tog 3 times (to the last sc.
So, as you can see, the symbols can be “translated” into “normal written pattern.” Crochet is filled with jargon (including all those abbreviations I used in the written form), and the symbols are just another form of that jargon. Once you get used to seeing them, they will be as easy to interpret as any abbreviation that you see commonly!
Let’s now look at an example of a chart written in rounds (for a traditional granny square).
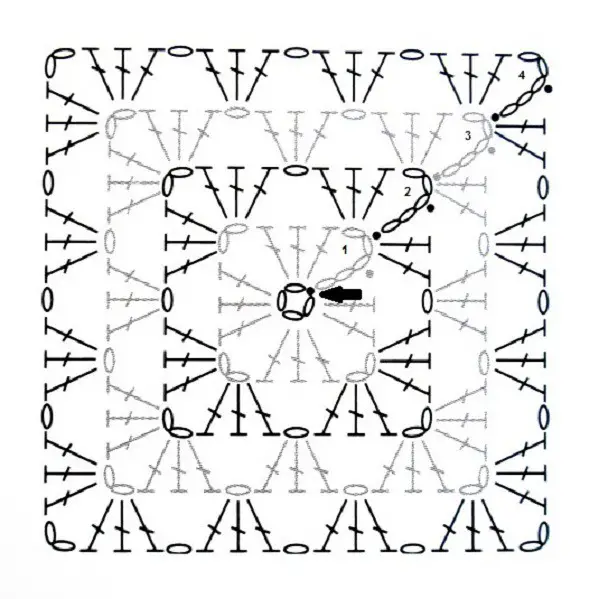
This one DOES indicate where to start! That bold black arrow points to the starting spot.
If you have a chart written in the round that DOES NOT indicate the starting spot, just know that the rule is ALWAYS start at the center! It will usually either have a large open circle/ring which indicates a “magic ring” or a number of chain stitches.
In this chart, you start by chaining 4 times, then do a slip stitch (the solid dot) back to the first chain. You can then see the color changes from black to gray. This shows that you are starting a new round. The premise is now the same as the previous example, but instead of back and forth, you are going to work counterclockwise around the pattern.
So, let’s now write out this chart in written pattern form.
- ch 4, slip stitch to 1st ch to form ring
- rnd 1: chain 5 (counts as 1st dc and ch 2), [dc 3 times into center of ring, ch 2] 3 times, dc 2 times into center of ring, sl st to 3rd t-ch
- rnd 2: sl st into ch-2-sp, ch 5, dc 3 times into same ch-2-sp, ch1, [dc 3 times into next ch-2-sp, ch 2, dc into same ch-2-sp, ch 1] 3 times, dc 2 times into initial ch-2-sp, sl st to 3rd ch of t-ch
- rnd 3: sl st into ch-2-sp, ch 5, dc 3 times into same ch-2-sp, ch1, [dc 3 times into next ch-1-sp, ch 1, dc 3 times into next ch-2-sp, ch 2, dc into same ch-2-sp, ch 1] 3 times, dc 3 times into next ch-1-sp, ch 1, dc 2 times into initial ch-2-sp, sl st to 3rd ch of t-ch
- rnd 4: sl st into ch-2-sp, ch 5, dc 3 times into same ch-2-sp, ch1, [(dc 3 times into next ch-1-sp, ch 1) 2 times, dc 3 times into next ch-2-sp, ch 2, dc into same ch-2-sp, ch 1] 3 times, [dc 3 times into next ch-1-sp, ch 1] 2 times, dc 2 times into initial ch-2-sp, sl st to 3rd ch of t-ch
So this pattern only has basic stitches and it is pretty repetitive. With all of those “repeats” it can be a bit confusing to read the written form of this pattern. In this case, it may be easier for you to look at the chart! Also when you look at the chart, you can probably visualize at least the basics of what the final product will look like.
Note that you cannot actually tell if you are working into a chain or into the chain space on the chart because all of the stitches do look like they are on top of a chain or another stitch. If the pattern does not specify, or you cannot read it (i.e. another language), you are going to have to decide which way you will go. This is where being a bit more of an advanced crocheter comes in handy; you kind of know what to look for. I would say that generally you work into a chain space instead of a specific chain, but that is super generalized and not going to be a “rule.”
These charts can get progressively more “complex” with intermediate to advanced crochet patterns (just like the written patterns get “harder” to read), but if you have a resource for what the symbols translate to, know where to start, and just take it one stitch at a time, you can read any of them!
Variations in Crochet Charts
Some charts may actually only show a partial section of the chart to save space. In this case, you will repeat the section that it shows over and over as many times as indicated for a chart written in rows, or until you make it back around to your starting spot when working in rounds.
When working in rows the repeat sections will be in giant [ ]. It may be either in the middle section of the row indicating to keep repeating those steps until you get to the end of the row, or it may be on the size grouping a few rows together, meaning to repeat those two entire rows the indicated number of times.
That may look something like this:
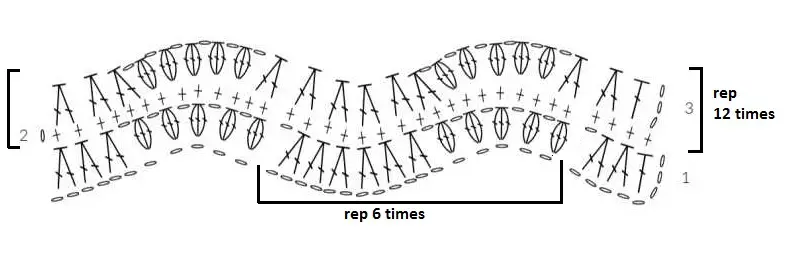
So in this case, you would actually need to add more chains to your foundation chain, but this can be easily calculated by multiplying the number of stitches in the repeat by 6, and adding it to the rest. Then when you work row 1, you are just going to go back to the first cluster stitch and start that section again.
Then for rows 4-28 you will just repeat rows 2 and 3 over and over. This keeps the chart from being supersized, while still giving you all the information you need.
Tips for Reading Crochet Charts
My top three tips for reaching a crochet chart are:
- Have your symbol definitions on hand to refer to (here is a complete chart you can save to refer back to!)
- Find the starting spot
- Take the chart one stitch at a time
Another tip about crochet charts is actually about the crochet symbols. The diagonal hash marks across the vertical bar of the stitch symbol indicate the number of “yarn overs” you start with. So a double crochet stitch has 1 diagonal hash mark, this indicates yarn over 1 time before inserting your hook into the stitch. If it has 3 hash marks it is a double treble crochet, where you start with yarn over 3 times.
This is super helpful to know for the special stitches like puffs and bobbles where the symbol will look overall the same as standard, but may have more has marks. Just add “yarn overs!”
My final recommendation is to practice! Look at some different charts, and practicing reading them out loud or writing them out in word/abbreviation form. Start with simple charts, then work your way up to complex. This will help you get comfortable with interpreting the chart before you attempt a big project.
Additional Resources for Reading Crochet Chart
I have three other posts that are in this series to help with reading charts and patterns. Feel free to check them out for more details about crochet terminology, abbreviations, stitches, and pattern reading.
“Decoding Crochet Jargon: Common Crochet Terminology and What It Means“
“Crochet Stitch Abbreviations and Symbols: With How to Guide For Each”
“How Do You Actually Read a Crochet Pattern: Written Form”
I hope that this clarified some things and makes crochet charts less intimidating! If you think of any other questions about reading a crochet chart, drop me a comment, and I will answer the best I can!
Now it is time for YOU to get Crafty with Ashy! Go grab a pattern and crochet away!!
Be sure to subscribe and follow me so you don’t miss any inspiration!