One of the main things that you need to master for crocheting is working into the foundation chain. This is how you start your second row of crocheting, and you need to do it for nearly every project that you work in rows. Once you learn this, you will be off and running for the rest of your project.
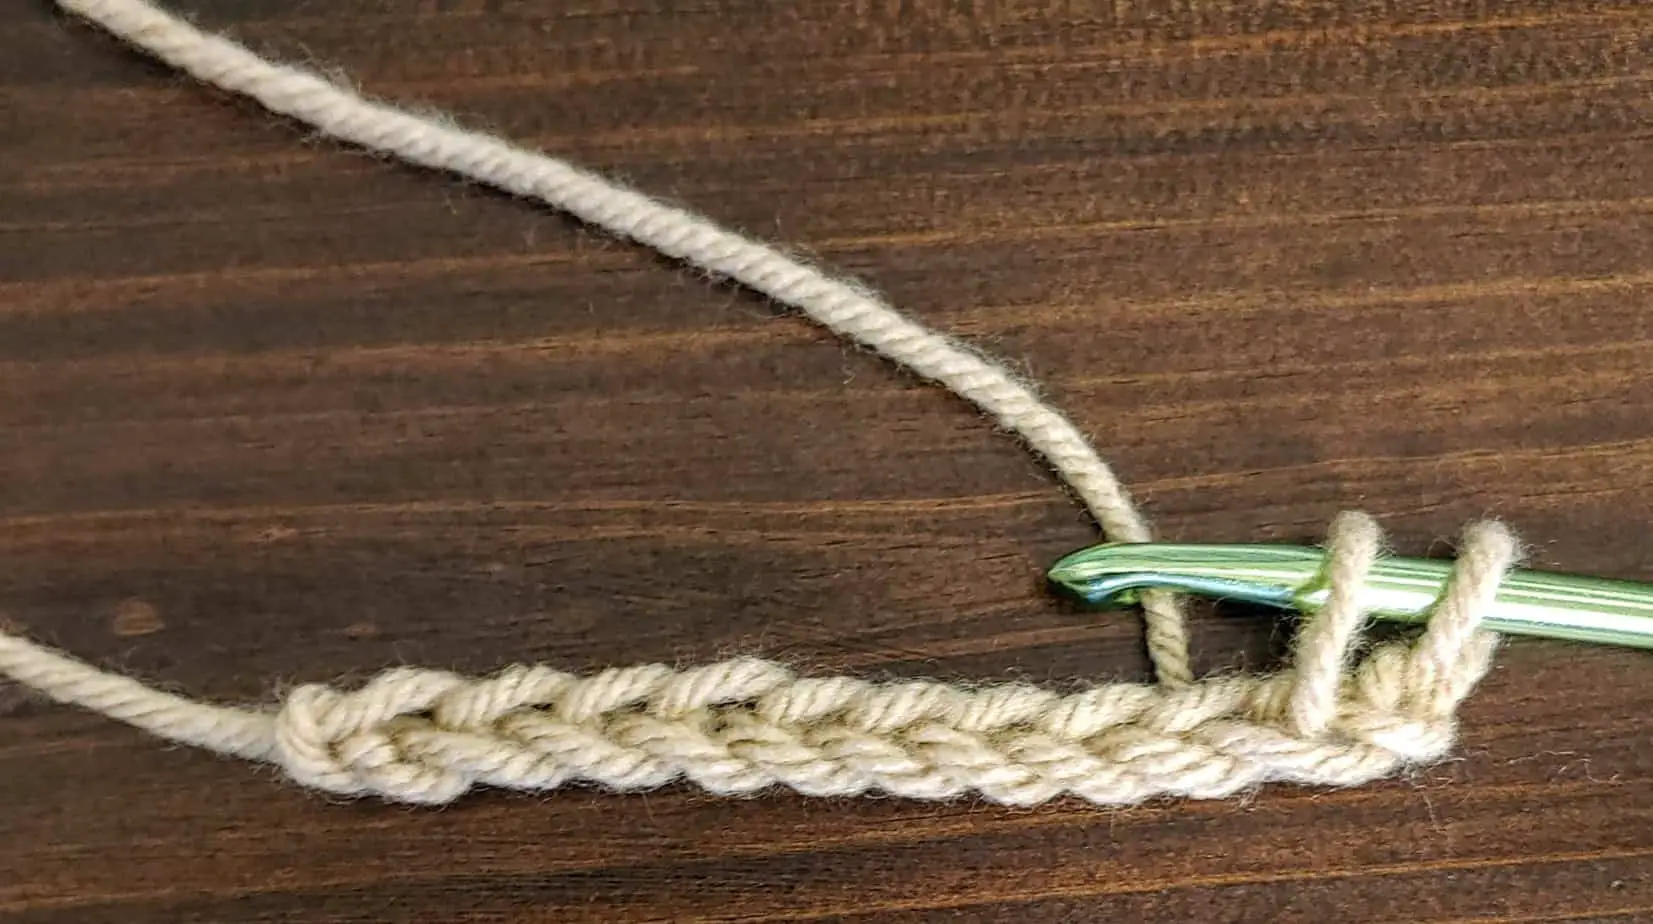
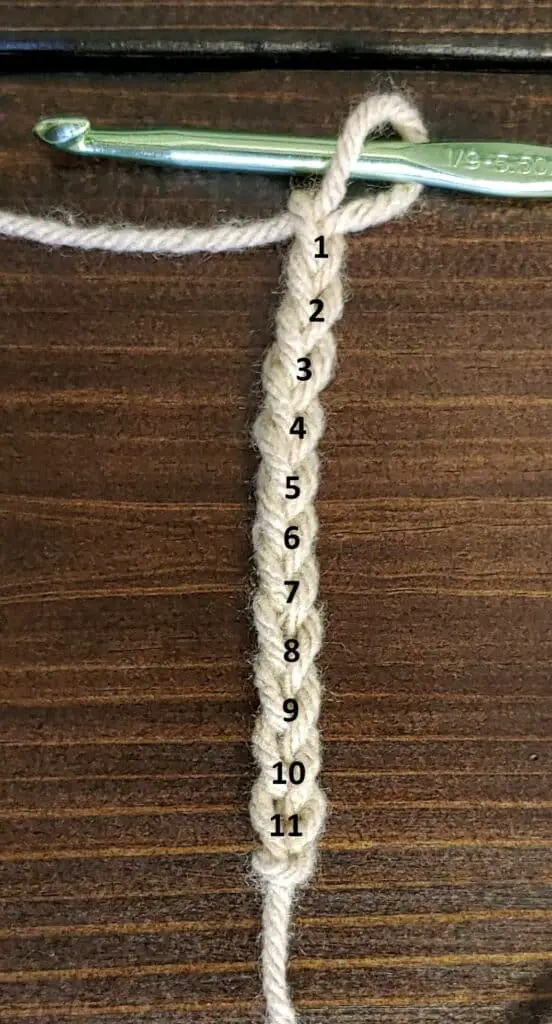
How do you start your second row? After you have finished your initial chains, turn your work so that you can work from right to left (if you are right-handed). You will then insert your hook into the chain that is 2nd from your hook and complete a single crochet. Then make a single crochet in each chain across.
So that is the very basic answer to the question, but if you are like most people beginning to crochet, that does not really mean a lot to you. What does the “second chain from the hook mean?” Where do I put my hook in the chain stitch? Continue reading for a detailed description of how and where to work into your chains and for helpful tips for troubleshooting if you are struggling!
Here is a video to supplement the written information if you prevent to watch and read (or just watch).
How to Start Crocheting into the Foundation Chain
Working into the foundation chain is the crochet lingo for when you have finished your row of chains that is called for in your pattern (or to the length you want your project to be if you aren’t following a pattern), and then you turn your work and make your second row of crochet, which is the first row of your “actual” crochet stitches.
*For clarity’s sake, I would like to note that the row of full stitches that you crochet into the foundation chain is actually called “row 1” in your pattern. The foundation chain row does not count as a row when they are numbered. Throughout the rest of the post, I will refer to the row of stitches worked into the foundation chain as “row 1.”
Each of the basic crochet stitches actually requires a different way to start row 1. You change a different number and insert the hook into a different spot for each type of stitch.
So, how do you start row 1 with each of the basic crochet stitches?
- Single crochet
- Crochet the number of chains that corresponds to the number of stitches you want as your width (so if you want 90 single crochet stitches, you would chain 90). Then, add 1 additional chain.
- Now, turn your chain so your hook is at the far right of the row to allow you to work from right to left (if you are a lefty, it is opposite).
- Place your first single crochet stitch in the 2nd chain from the hook (refer to picture for which chain that actually is).
- Note that the chain that you skip DOES NOT count as a stitch in single crochet.
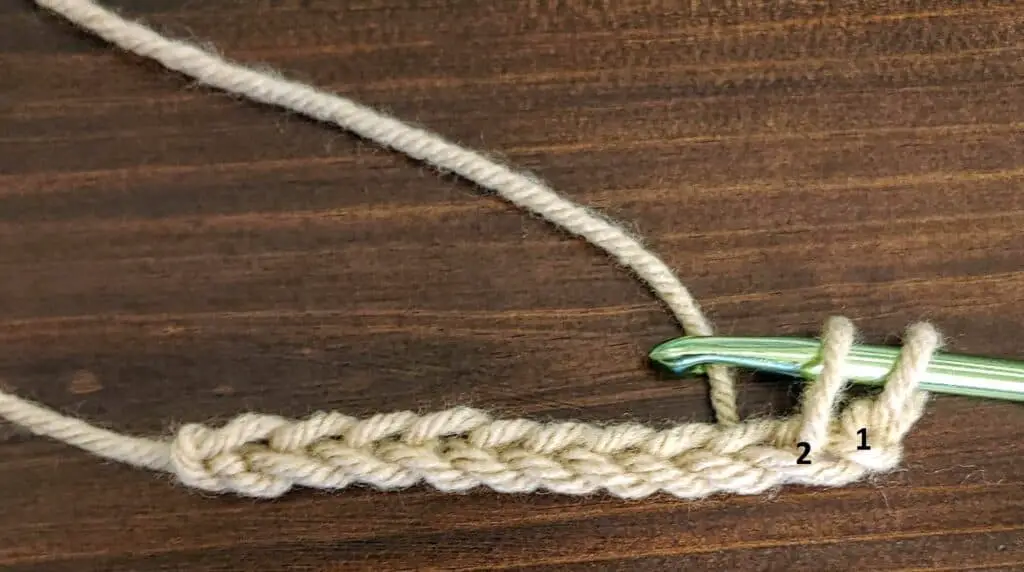
- Half-double crochet
- Crochet the number of chains that corresponds to the number of stitches you want as your width. Then, add 1 additional chain.
- Now, turn your chain so your hook is at the far right of the row to allow you to work from right to left (if you are a lefty, it is opposite).
- Place your first half-double crochet stitch in the 3rd chain from the hook (refer to picture for which chain that actually is).
- Note that the chains that you skip DOES count as one stitch in half-double crochet.

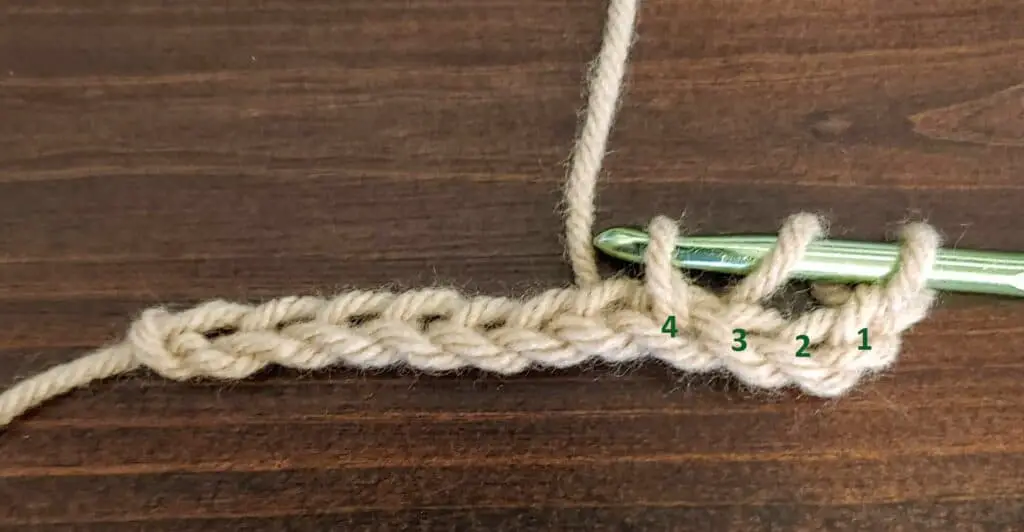
- Double crochet
- Crochet the number of chains that corresponds to the number of stitches you want as your width. Then, add 2 additional chains.
- Now, turn your chain so your hook is at the far right of the row to allow you to work from right to left (if you are a lefty, it is opposite).
- Place your first double crochet stitch in the 4th chain from the hook (refer to picture for which chain that actually is).
- Note that the chains that you skip DOES count as one stitch in double crochet.
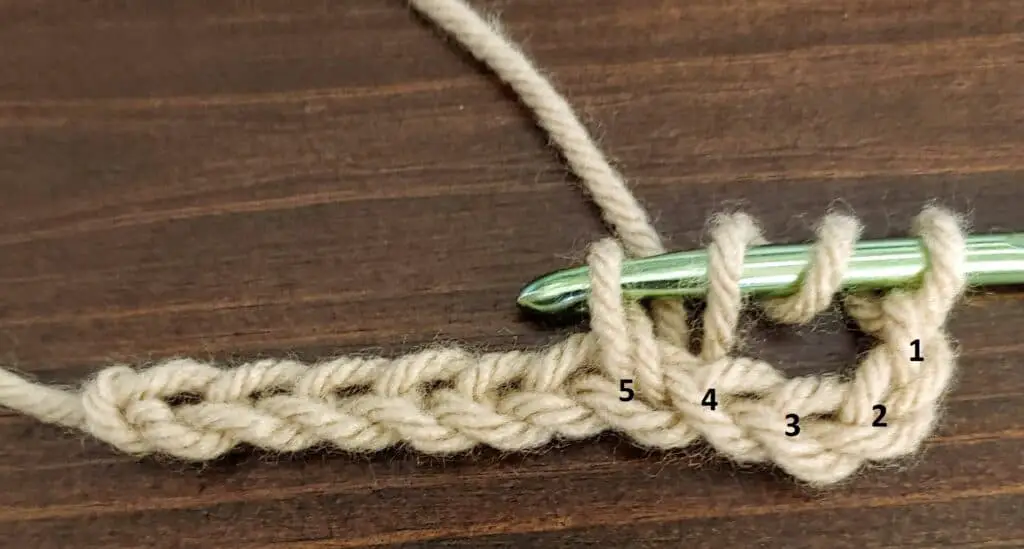
- Treble crochet
- Crochet the number of chains that corresponds to the number of stitches you want as your width. Then, add 3 additional chains.
- Now, turn your chain so your hook is at the far right of the row to allow you to work from right to left (if you are a lefty, it is opposite).
- Place your first treble crochet stitch in the 5th chain from the hook (refer to picture for which chain that actually is).
- Note that the chains that you skip DOES count as one stitch in treble crochet.
If you want to make taller stitches than that, you would add one more chain, then insert your hook 1 additional chain away from your hook. In every taller stitch, the skipped chains DO count as one stitch.
How to Continue Crocheting into the Foundation Chain
After you place your first stitch the appropriate number of chains away from the hook, there is no difference between the different basic crochet stitches for working in the rest of the chains.
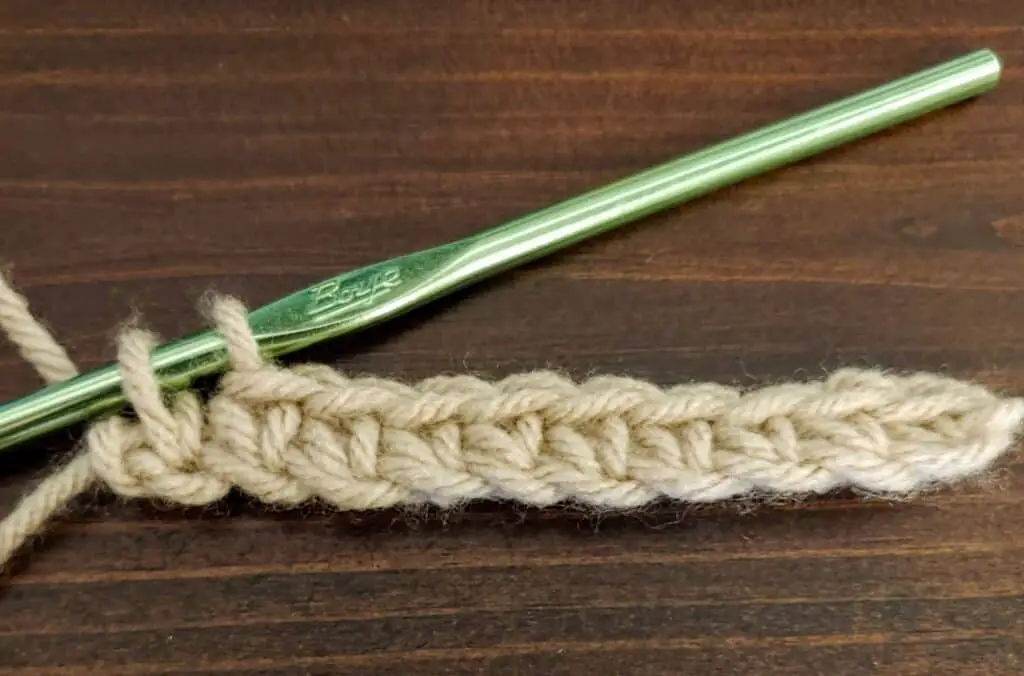
You crochet one stitch in each chain across your work. You want to make sure not to skip any chains or put two stitches in any chain.
When you reach the end of your row of foundation chains, you want to ensure you place a stitch into the last chain, closest to your slip knot, but not into your slip knot. (See picture below for reference).
When you count your stitches to ensure you have the correct number (either as you go or going back after you are done), make sure you are considering the chains that you skipped as a stitch for half-double crochet, double crochet, and treble crochet; but NOT for single crochet! (I know that can be confusing!)
Once you have worked a stitch in each chain across and made sure you have the right number, you are done with row 1 of your crochet project! It gets easier from here (usually)!
Variations of Crocheting into the Foundation Chain
Above I provided the “standard” way of crocheting into the foundation chain by inserting the hook under both the top and back loops. This is the way many, but not all, beginner tutorials and classes teach.
You will hear some people will argue that other ways of working into the foundation chain are “correct” or “better,” if you stick around the crochet world for long. Because a chain has 3 loops of yarn for each chain, you could theoretically place your hook in any of these loops.
There is no “correct” way to work into the foundation chain in terms of which loop you chose. Choose the technique that you like the best and the one you can be consistent with. The important thing is to use the same technique for the whole row of your project so you have a consistent look at the end, and so you don’t miss any chains.
Here are the variations in hook placement that you can choose from.
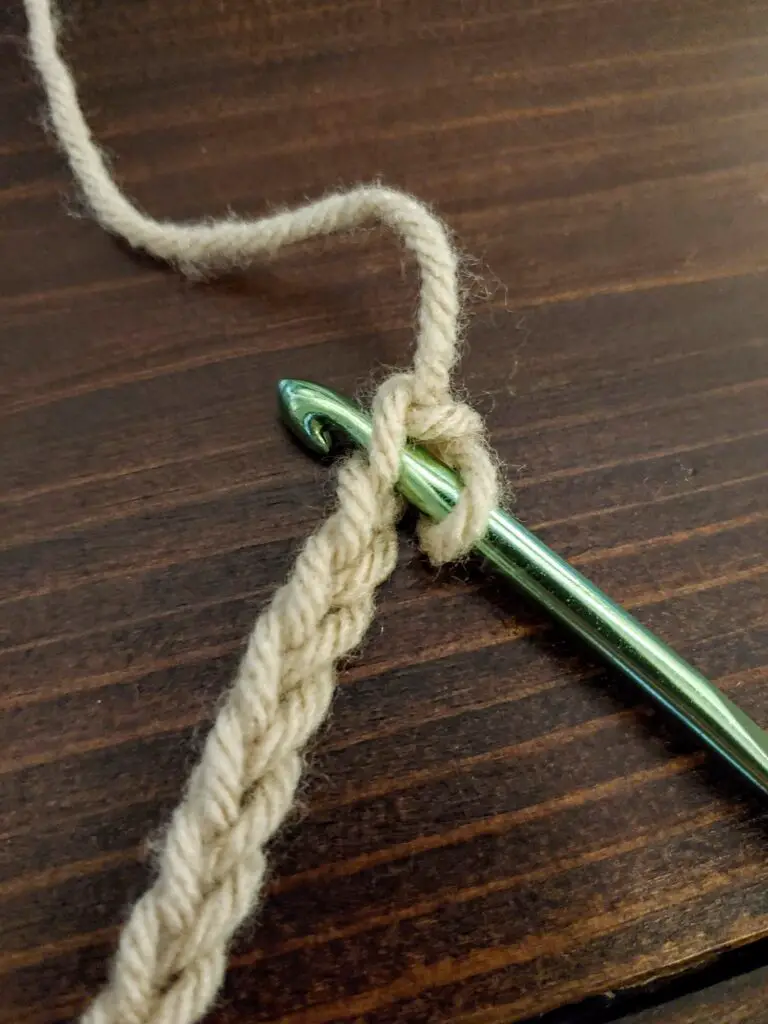
Inserting the hook under both the top and back loops
Like I said above, I would consider this the “standard” method that is taught. It results in the bottom of your finished project having a single loop showing.

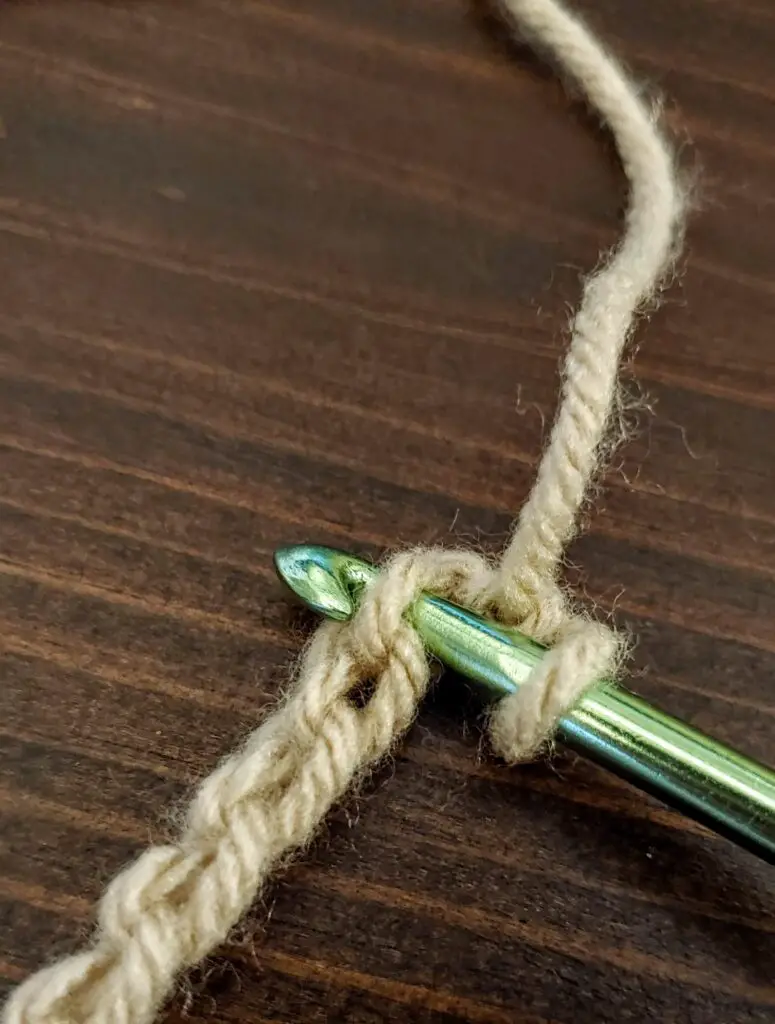
Inserting the hook under just the top loop
This is probably the second most common way, but that is just a guess. This is also touted as the “easiest” loop to work into. It is the easiest to see, that is for sure, but the easiest to work into would vary from person to person. This method will give you two loops at the bottom of your work.
Inserting the hook under only the back loop
This is the method that I prefer. Contrary to what many people say about this method, I find it easier to be consistent with, but you can totally feel differently! To each his own! I also like the look of it because you can see the “V” shape at the bottom of your work, which matches what the last row of your project will look like.
Inserting the hook under both the bottom and top loops (through the V)
This is a super rare method that to me seems difficult. But again, to each his own! Technically with this method, you are going into the same space as working in the back loop, but you are going in a different direction. This will result in a single loop at the bottom of your work.
Again, there is no “right way,” and don’t let people tell you otherwise! (VERY rarely a pattern will specify where you insert your hook into the chain if you see this, that is the exception. That is the “right way” for THAT pattern).
Some places say you should never insert your hook through just 1 loop. But in reality, there are always going to be 2 loops on one side of the hook and 1 on the other…So I don’t get that sentiment at all.
I say… choose what you like, and if you want to vary it from project to project for a slightly different look, go for it!
Troubleshooting Crocheting into the Foundation Chain
My chain and row 1 end up curling/spiraling after I finish row 1.
Usually, this does not indicate a problem. Your work will straighten out as you go. It is possible that your tension is too tight, but even with maintaining a consistent tension it kinda gets squirrelly until you have some substance to your project.
I end up with an arch after row 1.
In this case, your tension is definitely changing. There are 2 ways it could be changing. Tighter on the chain, looser on the stitches with make it a “sad face” curve down toward your chain. Whereas, looser on your chain, tighter on your stitches will make a “happy face” curve up away from your chain.
It is really hard to see where I need to place my hook and to actually insert my hook, into the chain.
You are probably crocheting too tightly. You could try a slightly bigger hook to make the chains, then switch to the size of hook called for in your pattern.
You could also try to make the loops in your chain a little looser. In general, when the yarn is on the hook it should look like a teardrop, not a circle right up against the hook. Many crocheters struggle with the chain being too tight, tending to “strangle” the hook when chaining.
I end up with the wrong number of stitches in row 1.
This could be happening for a variety of reasons.
- You could be counting wrong. Remember the skipped chains counting as a stitch for all but the single crochet.
- More likely though, with 3 loops to each chain, it is easy to accidental double up in one of them by putting a stitch through the top loop and then the back loop of the same chain, for example.
- Alternatively, when you insert your hook into one chain, it kind of squishes the chain next to it together and you could end up skipping one.
- Another cause is missing the final stitch because that last chain is hard to see sometimes.
- Lastly, you could be putting your first stitch in the wrong chain from your hook.
The bottom edge looks wonky, not smooth.
There are 2 main reasons this could be happening
- You could be twisting the foundation chain as you work it. This will result in a lumpy bottom edge.
- You could also be altering your tension from one chain to the next. If you have inconsistent chain sizes, the bottom edge of your work will look inconsistent.
So now you know how to start that second row of crochet (and that it is called “row 1”). Who knew there was so much to know about it and so many different ways to do it?! If you think of any other questions about it, drop me a comment, and I will answer the best I can!
Now it is time for YOU to get Crafty with Ashy! Tell me which method of working into the foundation chain you prefer in the comments!
Be sure to subscribe and follow me so you don’t miss any inspiration!
Great instructions! I have crocheted for awhile now, but shy away from ‘linear’ projects because of chains and stitch count have frustrated me with edges that are less than square. This clears up a bunch of questions for me, so thank you. Want to ask about the treble crochet instructions, though. You mentioned half double crochet, but I think you meant treble… is that correct or did I miss something?
I’m so glad the information was helpful and clear for you! I know this was probably the thing that took me the longest to figure out too, so I felt it was a really important post! You are absolutely correct about the treble crochet part! I have now updated the post. Thank you so much for taking the time to leave your comment. I really appreciate it!
Thank you for sharing you knowledge of crocheting. Your explanation of 1st row was very clear and understandable. I am a visual person and you had both. I like to see it first and then read the instructions. Thank you again
Thank you for taking the time to leave feedback! I am so glad the format was helpful for you!
Thank you so much for this info. I am teaching myself to crochet and this was very helpful. I have chained with a couple of different methods. But other information I have read made me feel “guilty” for the way I was doing it. I think I will try a new way again.
I also knit. I find, however, that crochet is much harder for me to “see” than knitting. Is this normal, or is it just me?
Crochet is an art, just like any other craft. There definitely isn’t really a “right” way to do it! I am so glad this was helpful. Definitely give them a try and see what you like the look and feel of the best!
I have actually never knitted! I think that switching from one to the other, no matter which one you learn first would definitely be an adjustment. You learn to look for certain things in crochet, which I bet are different from what you look for in knitting. I would say you are perfectly normal (as normal as any of us are! haha). Keep working on it, and I’m sure it will get more natural!